|
Home >> File Manager |
|
|
File Manager
This document provides information about DirectAdmin's built in file manager. The file manager allows you to fully interact with the server's file system. You can navigate folders, copy files, move files, rename files, delete files, change file permissions, create new folders, create new files, and upload files through your web browser.
Note: Use of the file manager with MS FrontPage extensions installed is not recommended. Use FrontPage instead. Navigating
The file manager may be accessed through the main control panel menu by clicking on the "File Manager" icon. A link to the file manager is also located at the bottom-left corner of the screen.
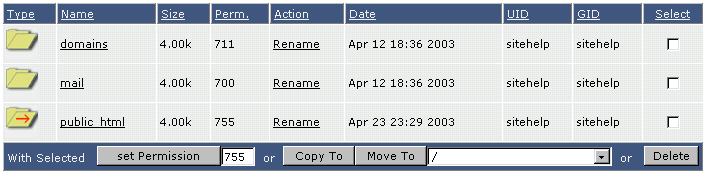
Navigating through folders is accomplished by clicking on the folder name or the folder icon (to the left of the folder name). For example, clicking the "domains" link (or folder icon) will bring us to a screen that looks like this:
You can always return to the previous directory by clicking "../ Up a Level" link. The "File Manager" link at the bottom-left corner of the screen will always return you to the highest possible directory.
Copying Files
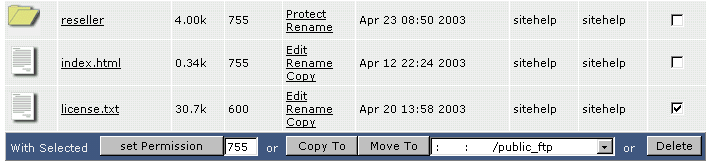
The file manager makes it easy to copy files between folders. The first step is to navigate to the source directory. That is, go into the directory you want to copy files from. In this example we are in public_html and we want to copy license.txt to the public_ftp directory.
Second, place a check next to the file(s) you want to copy. Then, choose the destination directory from the dropdown menu next to the "Move To" button. In the above picture the /public_ftp directory is selected. Finally, click the "Copy To" button.
The file manager will then ask if you want want to overwrite any existing files. If you select no, only files that don't exist in the destination directory will be copied. When the copying is complete, you will be taken to the destination directory and you will see the copied files there.
Moving Files
To move files, use the same procedure as copying files, except click the "Move To" button instead of the "Copy To" button. When the move is complete, you will be taken to the destination directory and you will see the moved files there.
Renaming Files / Folders
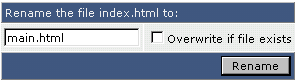
Next to each file/folder in the "Action" column (third column from the file/folder name) is a "Rename" link. Click the link next to the file or folder you wish to rename.
First, type in the new file name. If a file already exists by that name, click the checkbox if you want to overwrite that file.
Deleting Files / Folders
The steps for deleting a directory (folder) are the same as the steps for deleting a file. Please note that deleting a directory also erases everything inside of it.
First, place a check next to the file(s) or folder(s) you wish to delete. Then, click the "Delete" button at the bottom-right of the table. A popup will appear asking "Are you sure you want to delete these files?" Click "OK."
Changing File Permissions
The current permission level is listed in the table under the "Perm." column (second column from file/folder name). To change the permission level of a file or folder:
1. Place a check (last column) next to the file(s) or folder(s) you want to change. 2. Type in the numerical permission in the text box. 3. Click the "Set Permission" button.
Some common permission levels are:
Files
600 Makes a file inaccessible 644 Readable by everyone (e.g. HTML documents) 666 File can be read and modified (e.g. for HTML files modified by scripts) 755 File can be read and executed by everyone (e.g. for scripts) 777 Writable and executable by everyone (not recommended)
Directories
711 Files in directory can be read by everyone, but not directory contents 755 Files and contents of directory can be seen by everyone 777 Allows full read/write/delete access to a directory (not recommended)
Creating New Folders
Creating a new folder is very simple. First, navigate to the directory where you want the new folder to be. For example, if you want to create https://www.domain.com/news/, then you would navigate to the public_html directory.
Next, type in the folder name at the bottom of the screen and click the "Create" button. Please note that attempting to create a folder that already exists will not damage the existing folder in any way.
Creating New Files
To create a blank new file:
1. Navigate to the directory where you want the file to be. 2. Type in the file name in the "Create New File" text box. 3. Check "HTML template" to insert HTML tags into the file (optional) 4. Click the "Create" button.
Editing Files
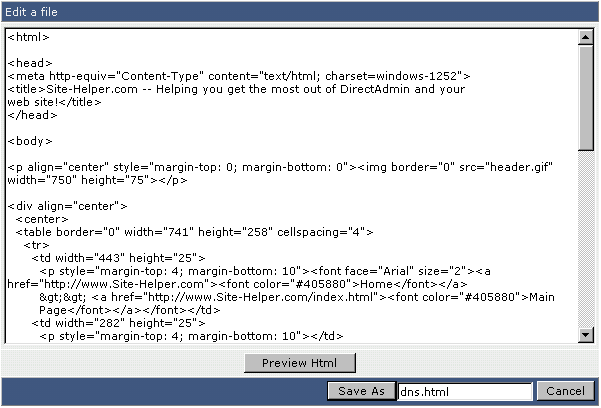
Certain files can be edited within the file manager. To edit a file, click the "Edit" link in the "Action" column next to the file.
In this example we are editing dns.html. To save the file, click the "Save As" button.
The "Preview HTML" button will pop up the document in a new window, allowing you to view the web page before saving it.
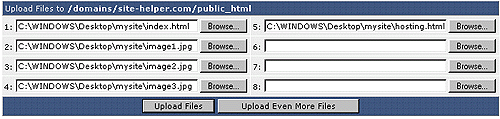
Uploading Files
1. Navigate to the directory where you want to upload files. 2. Click the "Upload files to current directory" button at the bottom of the screen.
3. You will see eight (8) fields. Click the "Browse" button to select the files you wish to upload. Click on "Upload Even More Files" if you wish to upload more than eight files at one time.
5. Click "Upload Files."
Need more help?
Please contact your hosting company for more assistance, or visit the DirectAdmin support forum at https://forum.directadmin.com. |
|
|
© 2003 JBMC Software. DirectAdmin licensees may reproduce this page for their own customers. Reproduction by other parties is prohibited.